
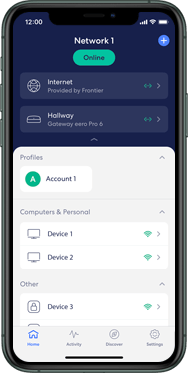
To remove Eero from the network, open the Eero app, locate the gateway Eero outlined in blue on the main screen, tap on it, and select “Remove Eero” at the bottom of the screen. Removing Eero from your network can be done easily through the Eero app.
Whether you are replacing an old Eero device or simply want to delete your network, following a few simple steps will ensure a smooth removal process. In this guide, we will walk you through the steps to remove Eero from your network, allowing you to make any necessary changes to your home network setup.
So, if you’re ready to get started, let’s dive in and discover how to remove Eero from your network.
Understanding Eero
To remove Eero from your network, open the Eero app and tap on the specific Eero device you want to remove. Then, go to the Advanced settings and select “Remove” followed by “Remove from Network. “
What Is Eero?
Eero is a popular mesh Wi-Fi system that provides seamless internet coverage throughout your home or office. It consists of multiple interconnected devices called eeros that work together to create a strong and reliable Wi-Fi network. Each eero acts as a router, extender, and access point, ensuring that your wireless devices have a fast and stable connection no matter where you are in the building.How Does Eero Work?
Eero works by using a mesh network topology. This means that multiple eero devices communicate with each other to create a unified network. Unlike traditional Wi-Fi systems that rely on a single router, eero distributes the workload among its devices, resulting in better coverage and faster speeds. Each eero unit is equipped with multiple antennas and powerful processors, allowing it to manage network traffic efficiently and deliver a seamless internet experience. When you set up an eero system, the devices automatically connect to each other and form a network. The main eero, also known as the gateway eero, is connected to your modem and acts as the primary point of contact with your ISP (Internet Service Provider). Additional eeros are placed strategically throughout your home or office to extend the network coverage and ensure a strong Wi-Fi signal in every corner. To remove an eero device from your network, follow these simple steps: 1. Open the eero app on your mobile device or computer. 2. Locate the eero device you want to remove from the network. 3. Tap on the device to access the advanced settings. 4. Look for the option to remove the eero device. 5. Tap on “Remove [eero device name]” to confirm the removal. 6. Wait for the removal process to complete, and the eero device will be disconnected from your network. Repeat these steps for each eero device you wish to remove. It’s important to note that removing an eero device may affect the coverage and performance of your network, so make sure to plan the placement of your eero units accordingly. If you ever need to reset your eero system or transfer ownership to a new user, refer to the official eero documentation or reach out to their customer support for detailed instructions. Now that you have a better understanding of eero and how it works, you can confidently manage and optimize your eero network as per your needs.
Credit: www.pcmag.com
Removing Eero From Network
To remove Eero from your network, open the Eero app and select the specific Eero device you want to remove. Tap on “Advanced” and then choose “Remove [Eero Name] Eero” followed by “Remove from Network. “
Step 1: Initiating The Device Removal
To remove an Eero device from your network, follow these simple steps: 1. Open the Eero app on your smartphone or tablet. 2. Locate the device you wish to remove from the network. 3. Tap on the device to access its settings. 4. Scroll down and select “Advanced” options. 5. Look for the option that says “Remove [device name] Eero” and tap on it. 6. Confirm your decision by tapping on “Remove from Network” when prompted.Step 2: Completing The Device Removal
Once you have initiated the device removal, follow these final steps to complete the process: 1. Wait for a few moments to allow the Eero app to disconnect the device from your network. 2. The device will no longer be listed under your network devices, indicating that it has been successfully removed. 3. If you have multiple Eero devices or need to remove additional devices, repeat the above steps for each device.Alternative Method: Deleting The Network
If you prefer to delete the entire network instead of removing individual Eero devices, you can follow these steps: 1. Open the Eero app on your smartphone or tablet. 2. Tap on the “Network” tab at the bottom of the screen. 3. Select “Settings” located in the top right corner of the screen. 4. Scroll down and choose “Delete Network.” 5. A confirmation prompt will appear, warning you that this action will delete all your network settings and permanently remove all associated devices. 6. If you are sure you want to proceed, tap on “Delete Network” to confirm. Please note that deleting the network will remove all devices associated with it, including any Eero devices. This method should only be used if you no longer wish to use the Eero system. By following these steps, you can easily remove an Eero device from your network or choose to delete the entire network if needed. Remember to repeat the process for each device you wish to remove individually.Replacing Eero On Network
Replacing an Eero device on your network is a straightforward process that ensures you can continue enjoying seamless internet coverage. Whether you are upgrading your Eero device or simply need to replace a faulty one, this guide will walk you through the steps to successfully complete the device replacement.
What You’ll Need
To start the device replacement process, gather the following items:
- A new Eero device that you want to add to your network
- A smartphone or tablet with the Eero app installed
- A stable internet connection
Step 1: Initiating The Device Replacement
To initiate the device replacement, follow these steps:
- Open the Eero app on your smartphone or tablet.
- Sign in to your Eero account.
- Tap on the menu icon in the top left corner of the screen.
- Select “Devices” from the menu options.
- Locate the Eero device that you want to replace.
- Tap on the device to access its settings.
- Scroll down and tap on the “Remove Eero” option.
- Follow the on-screen prompts to confirm the device removal.
Step 2: Completing The Device Replacement
Once you have initiated the device replacement, it’s time to complete the process:
- Unplug the old Eero device from the power source.
- Place the new Eero device in the desired location.
- Plug the new Eero device into a power outlet.
- Wait for the device to power up and establish a connection to the internet.
- Open the Eero app and sign in to your account.
- Tap on the menu icon and select “Devices” to access your device list.
- Tap on the “+” icon to add a new device.
- Follow the on-screen prompts to set up the new Eero device.
- Once the new device is successfully added, the replacement process is complete.
Congratulations! You have successfully replaced your Eero device on your network, ensuring uninterrupted internet coverage throughout your home.
Adding Eero To Network
Welcome to the step-by-step guide on adding Eero to your network. Below, we’ll walk you through each process, ensuring a seamless integration of your Eero into your network.
Step 1: Prepare Eero Device
Unbox your Eero device and connect the power cable to an electrical outlet. When the light on the device flashes blue, proceed to the next step.
Step 2: Install Eero App
Download and install the Eero app from the App Store or Google Play Store. Launch the app and sign in to your Eero account. If you don’t have an account, you can create one.
Step 3: Add Eero To Network
Within the Eero app, navigate to the “Add Eero” section. Follow the on-screen instructions to add your Eero device to the network. Make sure your mobile device is connected to the Wi-Fi network that you want your new Eero to join.
Step 4: Complete Setup
Once the app confirms that the Eero is successfully added to the network, test the connection by accessing the internet on your connected devices. If everything works as expected, your Eero has been successfully added to the network.
Resetting And Transferring Eero
Resetting and transferring your Eero device is a straightforward process that allows you to remove it from your network or transfer it to a new owner. Whether you want to reset a registered Eero device or transfer it to someone else, the following steps will guide you through the process.
Resetting A Registered Eero Device
If you need to reset a registered Eero device, follow these simple steps:
- Open the Eero app and locate the device you want to reset.
- Tap on the device and navigate to the advanced settings.
- Look for the option to reset the device and follow the on-screen instructions to complete the reset process.
Transferring Eero To A New Owner
Transferring your Eero device to a new owner involves a few steps to ensure a seamless transition. Here’s how you can transfer your Eero:
- Create an Eero account via the Eero app if you haven’t already.
- Scan the QR code provided by the original network owner using the app.
- Accept the transfer request and follow the on-screen instructions to complete the transfer process.
Credit: frontier.com
Common Issues And Faqs
To remove an Eero from your network, open the Eero app, tap the Eero you want to remove, then tap Advanced and select Remove “name” Eero. Finally, tap Remove from Network at the bottom of the screen. If you want to start over, open the Eero app, select Settings, tap Account settings, and then select ‘Delete account and data.
‘
How To Remove Eero Device From Network?
If you need to remove an Eero device from your network, follow these simple steps:
- Open the Eero app on your smartphone or tablet.
- Select the Eero device you want to remove from the list.
- Tap on the “Advanced” option.
- Scroll down and click on “Remove [Device Name] Eero”.
- Finally, tap on “Remove from Network” to confirm.
By following these steps, you can easily remove a specific Eero device from your network and ensure it is no longer connected.
How To Delete The Eero Network?
If you no longer need your Eero network and want to delete it completely, here’s what you need to do:
- Open the Eero app on your device.
- Go to the “Network Settings” section.
- Scroll down and look for the option to “Delete Network”.
- Tap on “Delete Network” and follow the prompts to confirm.
By deleting the Eero network, you will remove all the connected devices and settings associated with it, effectively erasing it from your network configuration.
Can’t Delete Network: Troubleshooting Solutions
If you are facing issues and unable to delete the Eero network, try the following troubleshooting solutions:
- Make sure you have the latest version of the Eero app installed on your device.
- Restart your Eero devices and your modem/router.
- Check your internet connection and ensure it is stable.
- Disable any VPN or firewall settings that may be interfering with the network deletion process.
- If the issue persists, contact Eero customer support for further assistance.
By following these troubleshooting steps, you can overcome the common issues that may arise when trying to delete your Eero network.
Additional Resources
To remove Eero from your network, open the Eero app and tap on the specific device. Then select “Remove Eero” and confirm the removal. Additionally, you can choose “Network Settings” to delete the entire network. If you need to transfer Eero to a new owner, follow the Network Transfer instructions in the app.
Best Way To Remove An Eero?
Removing an Eero from your network is a straightforward process. To remove an Eero device, follow these steps:
- Open the Eero app on your smartphone or tablet.
- Tap on the Eero device you wish to remove.
- Tap on “Advanced” to access more options.
- Scroll down and tap on “Remove [Eero Name] Eero.”
- Confirm your decision by tapping on “Remove from Network” at the bottom of the screen.
By following these steps, you can easily remove an Eero device from your network and proceed with any necessary changes or replacements.
How Do I Add Or Remove Eeros From My Network?
If you want to remove or add additional Eero devices to your network, the Eero app provides a user-friendly interface to manage your network setup. To add or remove Eeros from your network, simply follow these steps:
- Launch the Eero app on your mobile device.
- Tap on the Eero device that you want to add or remove.
- Access the “Advanced” settings for the Eero device.
- Select the option to either “Remove [Eero Name] Eero” or “Add an Eero to your network,” depending on your intended action.
- Follow the on-screen instructions to complete the process.
With these easy-to-follow steps, you can efficiently manage your Eero devices and make necessary adjustments to your network configuration.
How To Turn Off Wifi On The Gateway Eero?
Turning off the Wi-Fi on your gateway Eero device is necessary when you want to disable the network connection it provides. To turn off the Wi-Fi on your gateway Eero, you can follow these simple steps:
- Launch the Eero app on your smartphone or tablet.
- Select the Eero device that serves as the gateway for your network.
- Access the “Advanced” settings for the gateway Eero.
- Scroll down and locate the option to “Turn off Wi-Fi.”
- Toggle the switch to the “Off” position.
By turning off the Wi-Fi on your gateway Eero, you can temporarily disconnect the network connection without the need to remove the Eero device from your network altogether.
Credit: community.ui.com
Frequently Asked Questions Of How To Remove Eero From Network
How Do I Remove An Old Eero Device From My Network?
To remove an old eero device from your network, open the eero app and find your gateway eero. Tap on the eero and select Remove eero at the bottom of the screen. You can also delete your network by choosing Network Settings in the eero app.
How Do I Reset My Eero That Is Already Registered?
To reset your eero that is already registered, open the eero app and find your gateway eero. Tap on the eero and select “Remove eero” at the bottom of the screen. You can also delete your network by going to Network Settings in the eero app.
How Do I Delete My Eero Network And Start Over?
To delete your eero network and start over, open the eero app. Find your gateway eero outlined in blue at the bottom of the main screen. Tap on the eero and select “Remove eero” at the bottom of the screen.
You can also delete your network by choosing “Network Settings” in the eero app.
How Do I Transfer My Eero To A New Owner?
To transfer your eero to a new owner: 1. Open the eero app and locate your gateway eero outlined in blue at the bottom. 2. Tap on the eero and select “Remove eero” at the bottom of the screen. 3. You can also delete your entire network by going to Network Settings in the eero app.
How Do I Remove An Old Eero Device From My Network?
To remove an old Eero device, open the Eero app, select the device, and tap “Remove Eero” at the bottom of the screen.
How Do I Delete My Eero Network And Start Over?
To delete your Eero network, open the Eero application, tap on Settings, then Account settings, and select ‘Delete account and data’.
How Do I Reset My Eero That Is Already Registered?
To reset your registered Eero device, press and hold the reset button on the back of the device until the LED status light on the front flashes.
How Do I Transfer My Eero To A New Owner?
To transfer your Eero to a new owner, create an Eero account, scan the QR code from the original owner, and follow the instructions to complete the transfer.
Can Eero Devices Be Added Or Removed From My Network?
Yes, Eero devices can be added or removed from your network using the Eero app by selecting the specific device and choosing the appropriate action.
What Is The Best Method To Remove An Eero From A Network?
The best method to remove an Eero from a network is by using the Eero app and following the instructions to remove the specific device.
Conclusion
To remove Eero from your network, simply follow these steps. In the Eero app, locate your gateway Eero outlined in blue on the main screen. Tap on the Eero and select “Remove Eero” on the next screen. Alternatively, you can delete your network by accessing “Network Settings” in the Eero app.
It’s a quick and easy process that allows you to remove or reset your Eero device hassle-free. Say goodbye to unwanted Eero devices on your network with these simple steps.